How to Measure PDF Area with Cutouts and Depth
Quick answer
To measure net PDF area in PolyPDF, calibrate the current page, choose Area, trace and close the outer boundary, then select the measurement. In the Area Cutouts controls, choose Add Cutout and trace each opening fully inside the boundary. PolyPDF subtracts those cutout polygons from the outer area. If you enter a positive real-world Depth, the result changes from area to volume. Hatch pattern and hatch scale change appearance only, not the measured quantity.
Net-area takeoff is more useful when the annotation records the outer boundary, each excluded opening, and any depth used for volume. PolyPDF 1.3.4 keeps those inputs on one selectable measurement.
- Last verified
- Tested with
- PolyPDF 1.3.4 (build 16)
- Platforms
- macOS and Windows
Calibrate first, then define what “area” means
Set the scale for the exact page before tracing. Use a scale printed in the title block only when you know the PDF still has that plotted relationship; otherwise calibrate by drawing over a long, known dimension and verify a second span. PolyPDF stores the calibration per page, and an uncalibrated page reports square PDF points rather than pretending it knows real-world square feet or square metres.
Next decide the boundary convention. Gross floor area, finish area, slab area, roof membrane, paving, and paint coverage can use different faces and exclusions even on the same plan. Put that meaning in the Subject and project notes. Software can calculate the geometry you trace, but it cannot decide which side of a wall belongs in your scope.
- Use a long calibration reference and snapped endpoints where the PDF contains vector linework.
- Check a second known dimension before tracing a large or commercially significant area.
- Create a Scale Region when a detail on the page uses a different scale from the main view.
- State whether the boundary is gross, net, centerline, inside face, outside face, or another project convention.
Trace and close the outer boundary
- Choose the Area measurement tool.
- Click each meaningful turn around the outer boundary. Zoom in for short offsets and crowded corners.
- Close the figure at the starting point after at least three vertices.
- Select the completed area and inspect its handles against the intended boundary.
- Set the Subject and Status so the Takeoff Worksheet explains what the quantity represents.
- If the real boundary is intentionally curved, choose the Curved path option and verify the displayed curve follows it.
For a straight path, the area follows the polygon formed by the vertices. When the area path is set to Curved, PolyPDF 1.3.4 uses the displayed smoothed boundary in its area calculation rather than measuring only the straight chords between control points. Use the mode that matches the actual edge, not the one that merely looks cleaner.
Avoid self-intersecting boundaries and unnecessary points. A clean outline is easier to audit and less likely to hide a misplaced segment.
Subtract one or more interior cutouts
With the area selected, find Area Cutouts in the style controls and choose Add Cutout. Trace the first opening as a closed polygon. PolyPDF checks each cutout vertex against the stored straight outer control polygon and warns when a vertex falls outside it. That check does not prove that every connecting edge stays inside a concave outline, and a curved visible boundary can differ from the stored control polygon, so inspect the entire cutout at high zoom. Repeat Add Cutout for additional voids. The selected annotation shows the number of stored cutouts, and Remove Last removes the most recently added one.
net area = outer boundary area − Σ(each cutout area)
- Use cutouts for actual exclusions such as shafts, courtyards, large penetrations, or openings required by your scope.
- Keep cutouts wholly inside the outer boundary and inspect them at high zoom before accepting the total.
- Do not overlap cutouts. PolyPDF subtracts each stored polygon; overlapping rings can subtract the shared portion more than once.
- Do not use a cutout as a visual mask for an uncertain scope item. Record the decision and its basis.
Worked net-area example
Consider a calibrated rectangular slab measuring 40 feet by 30 feet. It contains a 5-by-4-foot shaft opening and a 10-by-3-foot stair opening. Trace the 40-by-30 outer boundary, then add each opening as its own cutout.
| Geometry | Calculation | Quantity |
|---|---|---|
| Outer slab | 40 ft × 30 ft | 1,200 sq ft |
| Shaft cutout | 5 ft × 4 ft | −20 sq ft |
| Stair cutout | 10 ft × 3 ft | −30 sq ft |
| Net slab | 1,200 − 20 − 30 | 1,150 sq ft |
1,200 sq ft − 20 sq ft − 30 sq ft = 1,150 sq ft
Review the annotated page as well as the total. A correct formula cannot detect that an opening was traced twice, that the wrong stair was excluded, or that the outer boundary followed the wrong face of wall.
Add depth only when volume is the intended quantity
A selected area measurement exposes a Depth field. Enter a positive real-world length in the current measurement format—for example, 4 inches, 0.1 metres, or 5 feet 3 inches. PolyPDF multiplies the net area by that depth and changes the worksheet quantity kind from Area to Volume. Clear the field to return to an area quantity.
volume = (outer area − cutout areas) × depth
Depth is a typed uniform value, not a third dimension detected from the drawing. Do not use one depth where the assembly varies without a documented averaging method. If multiple zones have different thicknesses, create separate area measurements so each volume has an explicit boundary, Subject, and depth.
PolyPDF requires a real-world page or region scale before accepting depth. That prevents an entered depth from being combined with an uncalibrated area to produce a misleading volume.
Hatch scale is visual, not mathematical
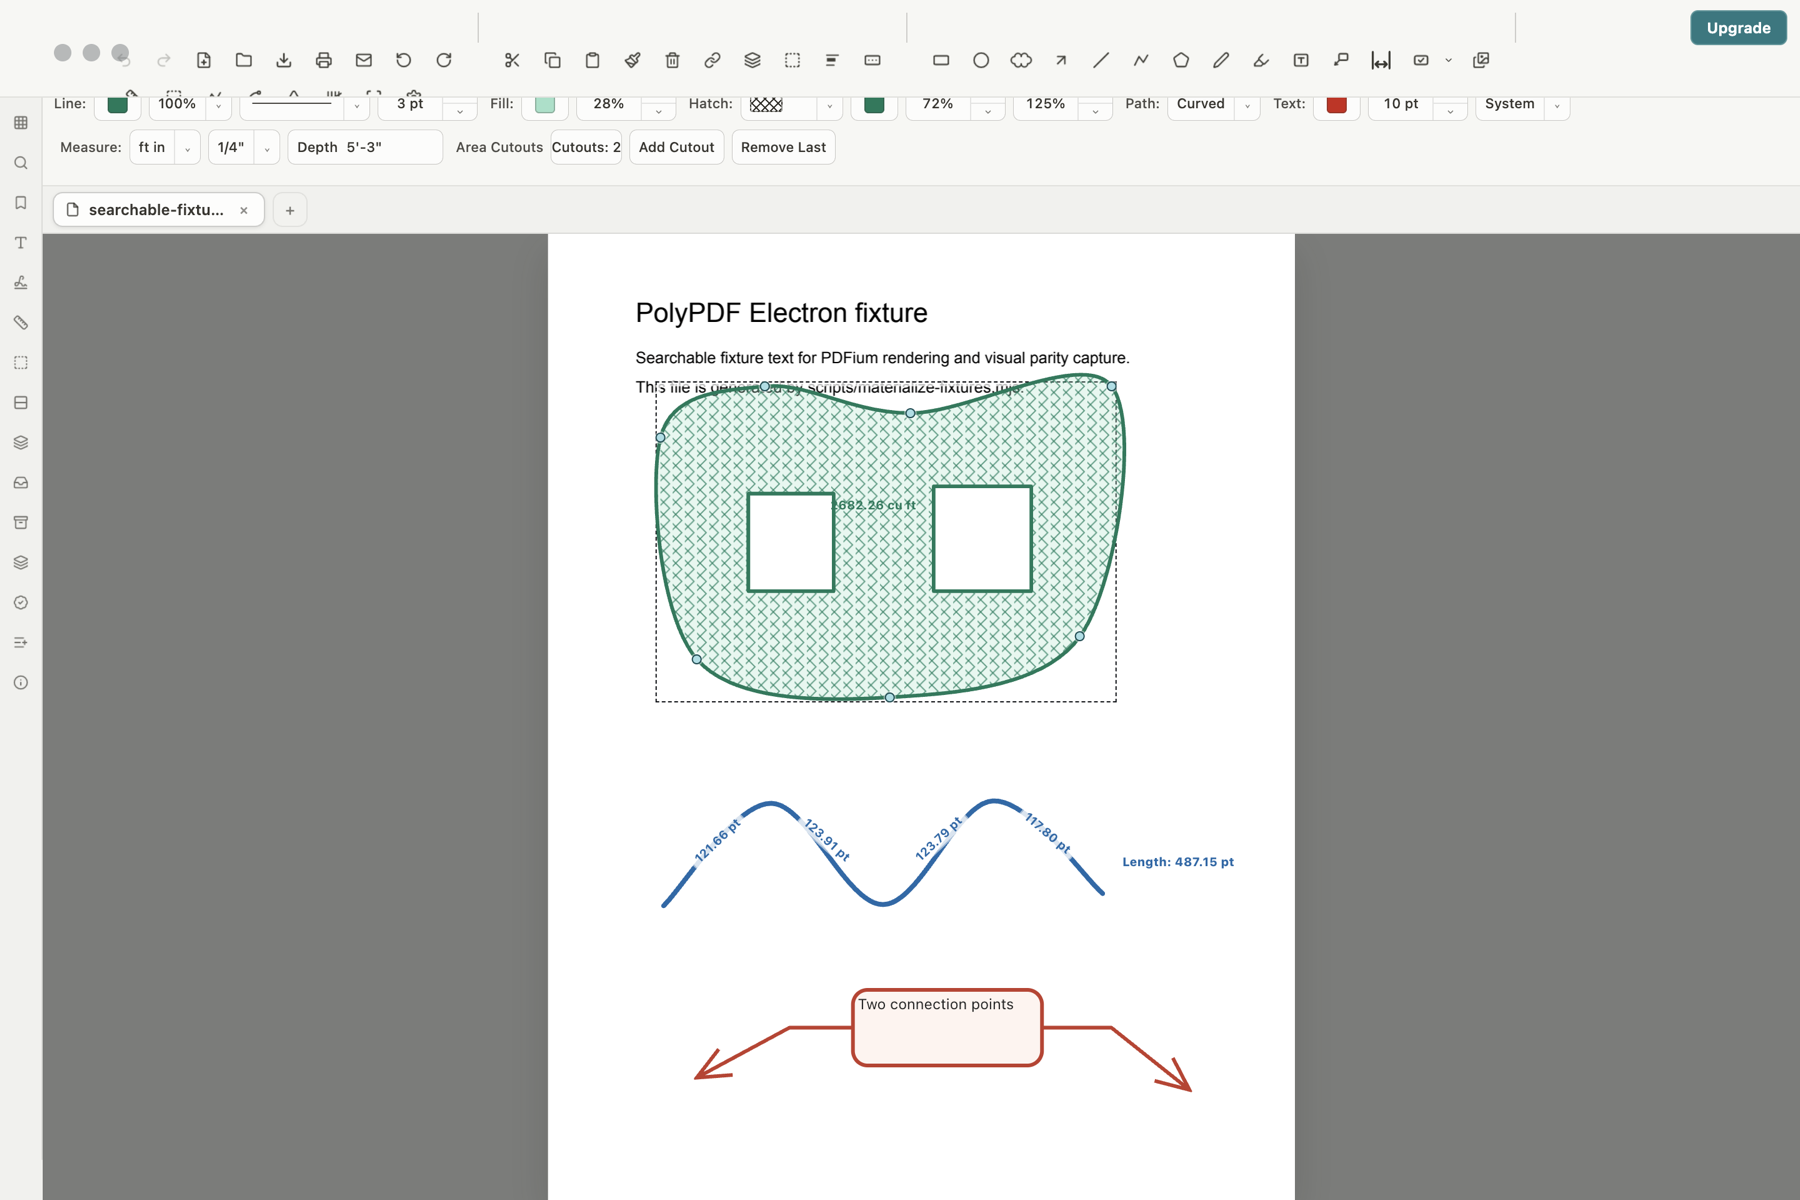
The Hatch controls set the pattern, colour, opacity, and scale used to draw the annotation. Increasing hatch scale changes the spacing or size of the pattern; it does not change the outer geometry, the cutouts, the net area, or the depth. The live 1.3.4 proof above shows a crosshatch at 125 percent so the two empty cutouts remain visually obvious.
| Control or edit | Changes quantity? | What it changes |
|---|---|---|
| Move a boundary vertex | Yes | Outer area geometry |
| Add or remove a cutout | Yes | Net area geometry |
| Switch Straight / Curved path | Yes | Measured boundary shape |
| Enter or clear Depth | Yes | Area versus volume and the resulting value |
| Change hatch scale, colour, or opacity | No | Annotation appearance only |
| Change displayed precision | No | Rounding and label presentation only |
Use a hatch that makes the included region and excluded openings easy to inspect at the zoom and print size reviewers will use. A decorative pattern should never obscure the very boundary it is meant to explain.
Accuracy and access limits to keep visible
- Calibration converts PDF geometry; it cannot repair nonuniform scan distortion, perspective, or a warped original.
- A net-area total is only as defensible as its source revision, boundary convention, scale verification, and cutout review.
- CSV or PDF export preserves the calculated records, not the reasoning behind an undocumented scope decision.
- The Free edition allows up to three hand-created measurements per document. Symbol Search auto-count remains uncapped and is separate from this manual area workflow.
The screenshot on this page is a live feature proof made from a generated test fixture. It demonstrates the controls and rendered geometry; it is not evidence of a customer project, field condition, or professional quantity conclusion.
Frequently asked questions
Can I add more than one cutout to a PDF area measurement?
Yes. PolyPDF 1.3.4 stores multiple cutout polygons on one area measurement and subtracts each from the outer area.
What does Depth do to an area measurement?
A positive real-world Depth multiplies the net area and changes the result to volume. Clear Depth to return to area.
Does changing hatch scale change measured area?
No. Hatch pattern, colour, opacity, and scale change only the annotation’s appearance. Boundary vertices, cutouts, path shape, calibration, and depth drive the quantity.
Does PolyPDF guarantee a cutout stays inside the visible outer area?
No. PolyPDF checks each traced vertex against the stored straight control polygon, but it does not prove every connecting edge stays inside a concave outline, and that polygon can differ from a curved visible boundary. Keep the complete ring visibly inside and inspect it at high zoom.
Can I use different depths inside one area?
One area measurement has one uniform Depth. For zones with different thicknesses, create separate areas so each boundary and depth is explicit.
Sources and further reading
Test a net-area workflow on your own PDF
Download PolyPDF for macOS or Windows, verify one page scale, and use the Free measurement allowance to trace a real boundary and its openings before deciding whether to unlock unlimited measurements.
Free with no trial timer. Hand-created measurements are capped at 3 per document.